Installing Jenkins
安装 Jenkins
本节的步骤适用于在单台/本地计算机上的 Jenkins 新安装。
Jenkins 通常使用内置的 Java Servlet 容器/应用服务器(Jetty)在其自己的进程中作为独立应用程序运行。
Jenkins 也可以在其他 Java servlet 容器(例如 Apache Tomcat 或 GlassFish)中作为 servlet 运行。但是,设置这些类型的安装的说明超出了本页的范围。
**注意:**尽管此页面侧重于 Jenkins 的本地安装,但此内容也可用于帮助在生产环境中设置 Jenkins。
系统要求
最低硬件要求:
- 256 MB 可用内存
- 1 GB 可用磁盘空间(如果将 Jenkins 作为 Docker 容器运行,建议最小为 10 GB)
为小团队推荐的硬件配置:
- 1 GB + 可用内存
- 50 GB+ 可用磁盘空间
全面的硬件建议:
- 硬件:请参阅 硬件建议 页面
软件要求:
- Java:请参阅 Java 要求 页面
- Web 浏览器:请参阅 Web 浏览器兼容性 页面
- 对于 Windows 操作系统:Windows 支持策略
安装平台
本节介绍如何在不同的平台和操作系统上安装/运行 Jenkins。
Docker
Docker 是一个用于在称为“容器”(或 Docker 容器)的隔离环境中运行应用程序的平台。诸如 Jenkins 之类的应用程序可以作为只读“镜像”(或 Docker 镜像)下载,每个映像都作为容器在 Docker 中运行。Docker 容器实际上是 Docker 镜像的“运行实例”。从这个角度来看,镜像或多或少地被永久地存储(即:只要镜像更新发布),而容器被临时存储。在 Docker 文档的入门指南,Getting Started, Part 1: Orientation and setup 页面中阅读有关这些概念的更多信息。
Docker 的基本平台和容器设计意味着可以在任何受支持的操作系统(macOS、Linux 和 Windows)或也运行着 Docker 的云服务(AWS 和 Azure)上运行单个 Docker 映像(对于任何给定的应用程序,如 Jenkins)。
安装 Docker
要将 Docker 安装在您的操作系统上,请访问 Docker store 网站,然后单击适用于您的操作系统或云服务的 Docker Community Edition 框。按照其网站上的安装说明进行操作。
Jenkins 也可以在 Docker 企业版上运行,您可以通过 Docker 商店网站上的 Docker EE 进行访问。
如果要在基于 Linux 的操作系统上安装 Docker,请确保配置 Docker,以便可以以非 root 用户身份对其进行管理。请在 Docker 文档的 Docker 的 Linux 安装后步骤 页面中阅读有关此内容的更多信息。该页面还包含有关如何配置 Docker 开机启动的信息。
在 Docker 中下载并运行 Jenkins
Jenkins 有多个可用的 Docker 镜像。
推荐使用的 Docker 镜像是 jenkinsci/blueocean 镜像(来自 Docker Hub 存储库)。该镜像包含了与所有 Blue Ocean 插件和功能捆绑在一起的 Jenkins 的当前长期支持(LTS)版本(可以投入生产使用)。这意味着您不需要单独安装 Blue Ocean 插件。
每次发布新版 Blue Ocean 时,都会发布新的
jenkinsci/blueocean镜像。您可以在 tags 页面上看到jenkinsci/blueocean镜像以前发布的版本列表。您还可以使用其他 Jenkins Docker 映像(在 Docker Hub 上可通过
jenkins/jenkins访问)。但是,这些不会随 Blue Ocean的发布而提供,需要通过 Jenkins 中的 Manage Jenkins > Manage Plugins 页面进行安装。 在 Blue Ocean 入门 中了解更多信息。
在 macOS 和 Linux 上
-
打开一个终端窗口。
-
使用以下
docker network create命令在 Docker 中创建 桥接网络:docker network create jenkins -
使用以下
docker volume create命令创建以下存储卷,这些存储卷用来共享连接到 Docker 守护程序所需的 Docker 客户端 TLS 证书,和持久化 Jenkins 数据:docker volume create jenkins-docker-certs docker volume create jenkins-data -
为了在 Jenkins 节点内执行 Docker 命令,请使用以下
docker container run命令下载并运行docker:dindDocker 镜像:docker container run \ --name jenkins-docker \ --rm \ --detach \ --privileged \ --network jenkins \ --network-alias docker \ --env DOCKER_TLS_CERTDIR=/certs \ --volume jenkins-docker-certs:/certs/client \ --volume jenkins-data:/var/jenkins_home \ --publish 2376:2376 \ docker:dind参数说明:
--name jenkins-docker:(可选)指定用于运行镜像的 Docker 容器名称。默认情况下,Docker 将为容器生成一个唯一的名称。--rm:(可选)关闭时自动删除 Docker 容器(Docker 镜像的实例)。它包含当被下面描述的jenkinsci/blueocean容器调用时 Docker 使用的 Docker 镜像缓存。--detach:(可选)在后台运行 Docker 容器。此实例可以稍后通过运行docker container stop jenkins-docker停止,并可以通过docker container start jenkins-docker再次启动。有关更多容器管理命令,请参阅docker container。--privileged:当前在 Docker 中运行 Docker 需要特权访问才能正常运行。使用较新的 Linux 内核版本可以放宽此要求。--network jenkins:这对应于先前步骤中创建的网络。--network-alias docker:使 Docker 容器中的 Docker 在jenkins网络中作为主机名docker可用。--env DOCKER_TLS_CERTDIR=/certs:在 Docker 服务器中启用 TLS 的使用。由于使用了特权容器,因此建议这样做,尽管它需要使用下面描述的共享存储卷。此环境变量控制被管理的 Docker TLS 证书的根目录。--volume jenkins-docker-certs:/certs/client:将容器内的/certs/client目录映射到上面创建的名为jenkins-docker-certs的 Docker 存储卷。--volume jenkins-data:/var/jenkins_home:将容器内的/var/jenkins_home目录映射到上面创建的名为jenkins-data的Docker 存储卷。这将允许此 Docker容器中的 Docker 守护程序控制的其他 Docker 容器从 Jenkins 装载数据。--publish 2376:2376:(可选)公开主机上的 Docker 守护程序端口。这对于在主机上执行docker命令来控制此内部 Docker 守护程序很有用。docker:dind:docker:dind镜像本身。可以使用以下命令在运行之前下载此映像:docker image pull docker:dind。
-
下载
jenkinsci/blueocean映像,并使用以下docker container run命令将其作为容器在 Docker 中运行:docker container run \ --name jenkins-blueocean \ --rm \ --detach \ --network jenkins \ --env DOCKER_HOST=tcp://docker:2376 \ --env DOCKER_CERT_PATH=/certs/client \ --env DOCKER_TLS_VERIFY=1 \ --publish 8080:8080 \ --publish 50000:50000 \ --volume jenkins-data:/var/jenkins_home \ --volume jenkins-docker-certs:/certs/client:ro \ jenkinsci/blueocean参数说明:
--name jenkins-blueocean:(可选)为jenkinsci/blueoceanDocker 镜像的此实例指定 Docker 容器名称。这使得后续的docker container命令更易于引用它。--rm:(可选)关闭时自动删除 Docker 容器(这是下面的jenkinsci/blueocean镜像的实例)。如果您需要退出 Jenkins,这可以保持整洁。--detach:(可选)在后台运行jenkinsci/blueocean容器(即“detached”模式)并输出容器 ID。如果未指定此选项,则在终端窗口中输出此容器的运行中的 Docker 日志。--network jenkins:将此容器连接到先前步骤中定义的jenkins网络。这使得上一步中的 Docker 守护程序可以通过主机名docker应用于此 Jenkins 容器。--env DOCKER_HOST=tcp://docker:2376:指定docker、docker-compose和其他 Docker 工具用于连接上一步中的 Docker 守护程序的环境变量。--publish 8080:8080:将jenkinsci/blueocean容器的端口 8080映射(即“发布”)到主机上的端口 8080。第一个数字表示主机上的端口,而最后一个数字表示容器的端口。因此,如果为该选项指定-p 49000:8080,则将通过主机上的端口 49000 访问 Jenkins。--publish 50000:50000:(可选)将jenkinsci/blueocean容器的端口 50000 映射到主机上的端口 50000。仅当您在其他计算机上设置了一个或多个基于 JNLP 的 Jenkins 代理时才需要这样做,这些代理又与jenkinsci/blueocean容器(充当“master” Jenkins服务器,或仅充当“ Jenkins master服务器”)交互。基于 JNLP 的 Jenkins 代理默认情况下通过 TCP 端口 50000 与 Jenkins master 服务器通信。您可以通过 Configure Global Security 页面在 Jenkins master 服务器上更改此端口号。如果要将 JNLP 代理程序的 Jenkins master 服务器的 TCP 端口更改为 51000(例如),则需要重新运行 Jenkins(通过此docker run …命令),并使用以下命令指定此 “publish” 选项--publish 52000:51000,其中最后一个值与 Jenkins 主服务器上更改后的值匹配,并且第一个值是 Jenkins master 服务器主机上的端口号,基于 JNLP 的 Jenkins 代理通过其通信(与 Jenkins master 服务器) - 即 52000。请注意,Jenkins 2.217 中的 WebSocket 代理不需要此配置。--volume jenkins-data:/var/jenkins_home:将容器中的/var/jenkins_home目录映射到名称为jenkins-data的 Docker volume。除了将/var/jenkins_home目录映射到 Docker 存储卷之外,您还可以将此目录映射到计算机本地文件系统上的目录。例如,指定选项--volume $HOME/jenkins:/var/jenkins_home会将容器的/var/jenkins_home目录映射到本地计算机上$HOME目录中的jenkins子目录,该目录通常是/Users/<your-username>/jenkins或者/home/<your-username>/jenkins。请注意,如果您为此更改源存储卷或目录,则需要更新上述docker:dind容器中的存储卷以匹配此卷。--volume jenkins-docker-certs:/certs/client:ro:将/certs/client目录映射到先前创建的jenkins-docker-certs存储卷。这使连接到 Docker 守护程序所需的客户端 TLS 证书在DOCKER_CERT_PATH环境变量指定的路径中可用。jenkinsci/blueocean:jenkinsci/blueoceanDocker 镜像本身。如果尚未下载该镜像,则此docker container run命令将自动为您下载该镜像。此外,如果自上次运行此命令以来已发布了对该镜像的任何更新,则再次运行该命令将自动为您下载这些发布的镜像更新。**注意:**也可以使用docker image pull命令独立下载(或更新)此 Docker 镜像:docker image pull jenkinsci/blueocean
在 Windows 上
Jenkins 项目提供 Linux 容器镜像,而不是 Windows 容器镜像。确保将 Docker for Windows 安装配置为运行 Linux Containers 而不是 Windows Containers。请参阅 Docker 文档以获取 switch to Linux containers 的说明。配置为运行 Linux Containers 后,步骤如下:
-
打开命令提示符窗口。
-
使用以下
docker network create命令在 Docker 中创建 桥接网络:docker network create jenkins -
使用以下
docker volume create命令创建以下存储卷,这些存储卷用来共享连接到 Docker 守护程序所需的 Docker 客户端 TLS 证书,和持久化 Jenkins 数据:docker volume create jenkins-docker-certs docker volume create jenkins-data -
为了在 Jenkins 节点内执行 Docker 命令,请使用以下
docker container run命令下载并运行docker:dindDocker 镜像:docker container run --name jenkins-docker --rm --detach ^ --privileged --network jenkins --network-alias docker ^ --env DOCKER_TLS_CERTDIR=/certs ^ --volume jenkins-docker-certs:/certs/client ^ --volume jenkins-data:/var/jenkins_home ^ docker:dind -
下载
jenkinsci/blueocean映像,并使用以下docker container run命令将其作为容器在 Docker 中运行:docker container run --name jenkins-blueocean --rm --detach ^ --network jenkins --env DOCKER_HOST=tcp://docker:2376 ^ --env DOCKER_CERT_PATH=/certs/client --env DOCKER_TLS_VERIFY=1 ^ --volume jenkins-data:/var/jenkins_home ^ --volume jenkins-docker-certs:/certs/client:ro ^ --publish 8080:8080 --publish 50000:50000 jenkinsci/blueocean有关每个选项的说明,请参阅上面的 macOS and Linux 说明。
访问 Jenkins/Blue Ocean Docker 容器
如果您有使用 Docker 的经验,并且希望或需要使用 docker container exec 命令通过终端/命令提示符访问 jenkinsci/blueocean 容器,您可以添加 --name jenkins-blueocean 之类的选项(在上面的 docker container run 中),它将为 jenkinsci/blueocean 容器命名为 “jenkins-blueocean”。
这意味着您可以使用如下类似的 docker container exec 命令(通过单独的终端/命令提示符窗口)访问容器:
docker container exec -it jenkins-blueocean bash
通过 Docker 日志访问 Jenkins 控制台日志
您可能需要访问 Jenkins 控制台日志。例如,在 Unlocking Jenkins 作为 Post-installation setup wizard 的一部分时。
如果您没有在 上面 的 docker container run … 命令中指定分离模式选项 --detach,那么可以通过运行该 Docker 命令的终端/命令提示符窗口轻松访问 Jenkins 控制台日志。
否则,您可以使用以下命令通过 jenkinsci/blueocean 容器的 Docker logs 访问 Jenkins 控制台日志:
docker container logs <docker-container-name>
您的 <docker-container-name> 可以使用 docker container ls 命令获取。如果您在上面的 docker container run … 命令中指定了 --name jenkins-blueocean 选项(另请参阅 访问 Jenkins/Blue Ocean Docker 容器),您可以简单地使用 docker container logs 命令:
docker container logs jenkins-blueocean
访问 Jenkins 家目录
您可能需要访问 Jenkins 家目录。例如,在 workspace 子目录中检查 Jenkins 构建的详细信息。
如果您将 Jenkins 家目录(/var/jenkins_home)映射到计算机的本地文件系统上的目录(即,在 上面 的 docker container run … 命令),那么您可以通过计算机的常规终端/命令提示符访问该目录的内容。
除此之外,如果您在 docker container run … 命令中指定了 --volume jenkins-data:/var/jenkins_home 选项,您可以使用 docker container exec 命令通过 jenkinsci/blueocean 容器的终端/命令提示符访问 Jenkins 家目录的内容:
docker container exec -it <docker-container-name> bash
如上所述,您的 <docker-container-name> 可以使用 docker container ls 命令获取。如果您在上面的 docker container run … 命令中指定了 --name jenkins-blueocean 选项(另请参阅 访问 Jenkins/Blue Ocean Docker 容器),您可以简单地使用 docker container exec 命令:
docker container exec -it jenkins-blueocean bash
Post-installation setup wizard
After downloading, installing and running Jenkins using one of the procedures above, the post-installation setup wizard begins.
This setup wizard takes you through a few quick “one-off” steps to unlock Jenkins, customize it with plugins and create the first administrator user through which you can continue accessing Jenkins.
Unlocking Jenkins
When you first access a new Jenkins instance, you are asked to unlock it using an automatically-generated password.
-
Browse to
http://localhost:8080(or whichever port you configured for Jenkins when installing it) and wait until the Unlock Jenkins page appears.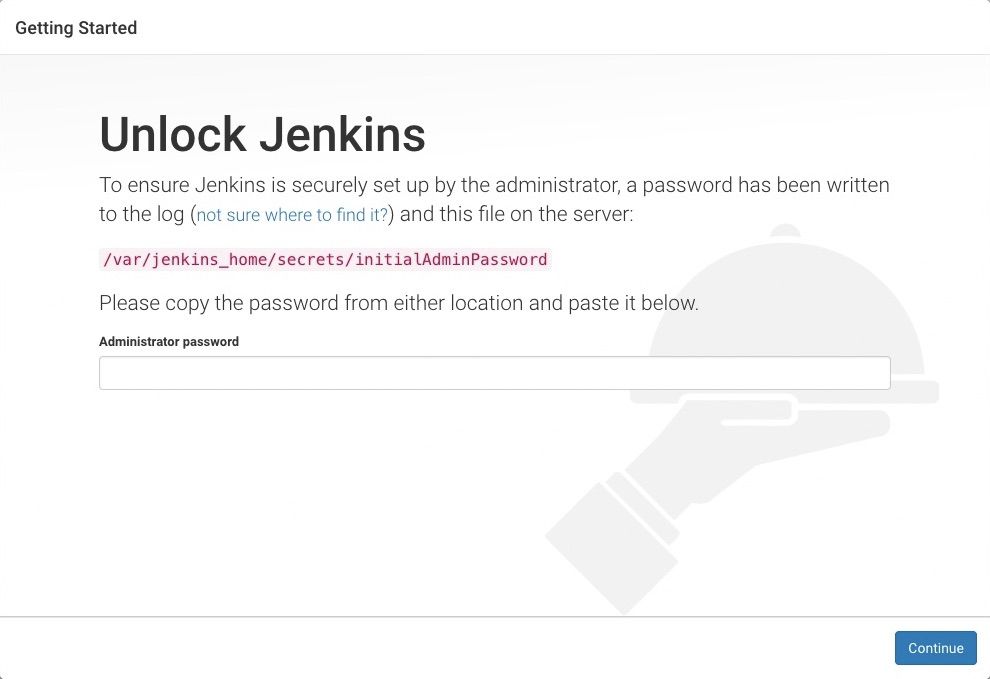
-
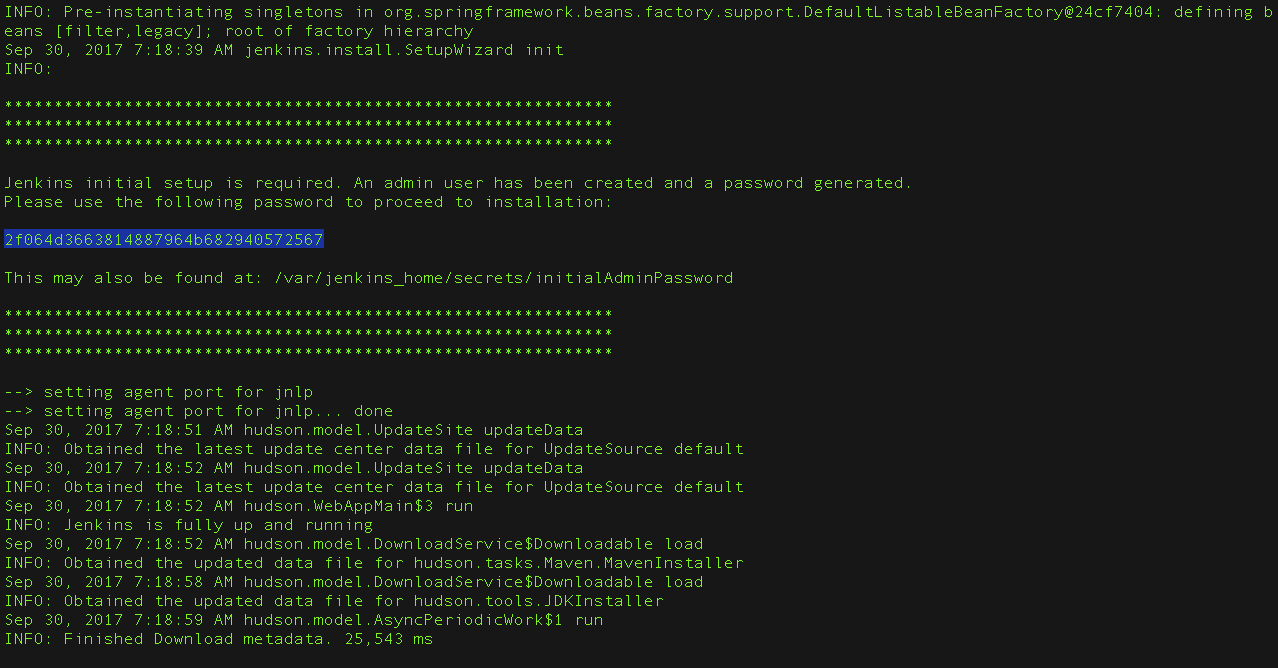
From the Jenkins console log output, copy the automatically-generated alphanumeric password (between the 2 sets of asterisks).
 Note:
Note:- The command:
sudo cat /var/lib/jenkins/secrets/initialAdminPasswordwill print the password at console. - If you are running Jenkins in Docker using the official
jenkins/jenkinsimage you can usesudo docker exec ${CONTAINER_ID or CONTAINER_NAME} cat /var/jenkins_home/secrets/initialAdminPasswordto print the password in the console without having to exec into the container.
- The command:
-
On the Unlock Jenkins page, paste this password into the Administrator password field and click Continue. Notes:
- If you ran Jenkins in Docker in detached mode, you can access the Jenkins console log from the Docker logs (above).
- The Jenkins console log indicates the location (in the Jenkins home directory) where this password can also be obtained. This password must be entered in the setup wizard on new Jenkins installations before you can access Jenkins’s main UI. This password also serves as the default admininstrator account’s password (with username “admin”) if you happen to skip the subsequent user-creation step in the setup wizard.
Customizing Jenkins with plugins
After unlocking Jenkins, the Customize Jenkins page appears. Here you can install any number of useful plugins as part of your initial setup.
Click one of the two options shown:
- Install suggested plugins - to install the recommended set of plugins, which are based on most common use cases.
- Select plugins to install - to choose which set of plugins to initially install. When you first access the plugin selection page, the suggested plugins are selected by default.
If you are not sure what plugins you need, choose Install suggested plugins. You can install (or remove) additional Jenkins plugins at a later point in time via the Manage Jenkins > Manage Plugins page in Jenkins.
The setup wizard shows the progression of Jenkins being configured and your chosen set of Jenkins plugins being installed. This process may take a few minutes.
Creating the first administrator user
Finally, after customizing Jenkins with plugins, Jenkins asks you to create your first administrator user.
- When the Create First Admin User page appears, specify the details for your administrator user in the respective fields and click Save and Finish.
- When the Jenkins is ready page appears, click Start using Jenkins.
Notes:
- This page may indicate Jenkins is almost ready! instead and if so, click Restart.
- If the page does not automatically refresh after a minute, use your web browser to refresh the page manually.
- If required, log in to Jenkins with the credentials of the user you just created and you are ready to start using Jenkins!
From this point on, the Jenkins UI is only accessible by providing valid username and password credentials.
Offline Jenkins Installation
This section describes how to install Jenkins on a machine that does not have an internet connection.
To install Jenkins itself, download the appropriate war file and transfer it to your machine.
Plugins are a different matter, due to dependency requirements.
The recommended approach is to use Plugin Installation Manager Tool.
If you want to transfer the individual plugins, you’ll need to retrieve all dependencies as well. There are several dependency retrieval scripts and tools on Github. For example:
- install-plugins.sh - Bash script for managing plugins from the official Docker image for Jenkins
- samrocketman/jenkins-bootstrap-shared - Java is required; packages Jenkins and plugins into an immutable package installer. Supported formats include: RPM, DEB, Docker. Can proxy Jenkins and plugins through Nexus or Artifactory since Gradle is used to assemble plugins.
Jenkins Parameters
Jenkins initialization can also be controlled by run time parameters passed as arguments. Command line arguments can adjust networking, security, monitoring, and other settings.
Networking parameters
Jenkins networking configuration is generally controlled by command line arguments. The networking configuration areguments are:
| Command Line Parameter | Description |
|---|---|
--httpPort=$HTTP_PORT |
Runs Jenkins listener on port $HTTP_PORT using standard http protocol. The default is port 8080. To disable (because you’re using https), use port -1. This option does not impact the root URL being generated within Jenkins logic (UI, JNLP files, etc.). It is defined by the Jenkins URL specified in the global configuration. |
--httpListenAddress=$HTTP_HOST |
Binds Jenkins to the IP address represented by $HTTP_HOST. The default is 0.0.0.0 — i.e. listening on all available interfaces. For example, to only listen for requests from localhost, you could use: --httpListenAddress=127.0.0.1 |
--httpsPort=$HTTPS_PORT |
Uses HTTPS protocol on port $HTTPS_PORT. This option does not impact the root URL being generated within Jenkins logic (UI, JNLP files, etc.). It is defined by the Jenkins URL specified in the global configuration. |
--httpsListenAddress=$HTTPS_HOST |
Binds Jenkins to listen for HTTPS requests on the IP address represented by $HTTPS_HOST. |
--http2Port=$HTTP_PORT |
Uses HTTP/2 protocol on port $HTTP_PORT. This option does not impact the root URL being generated within Jenkins logic (UI, JNLP files, etc.). It is defined by the Jenkins URL specified in the global configuration. |
--http2ListenAddress=$HTTPS_HOST |
Binds Jenkins to listen for HTTP/2 requests on the IP address represented by $HTTPS_HOST. |
--prefix=$PREFIX |
Runs Jenkins to include the $PREFIX at the end of the URL. For example, set –prefix=/jenkins to make Jenkins accessible at http://myServer:8080/jenkins |
--ajp13Port=$AJP_PORT |
Runs Jenkins listener on port $AJP_PORT using standard AJP13 protocol. The default is port 8009. To disable (because you’re using https), use port -1. |
--ajp13ListenAddress=$AJP_ADDR |
Binds Jenkins to the IP address represented by $AJP_HOST. The default is 0.0.0.0 — i.e. listening on all available interfaces. |
--sessionTimeout=$TIMEOUT |
Sets the http session timeout value to $SESSION_TIMEOUT minutes. Default to what webapp specifies, and then to 60 minutes |
Miscellaneous parameters
Other Jenkins initialization configuration is also controlled by command line arguments. The miscellaneous configuration arguments are:
| Command Line Parameter | Description |
|---|---|
--argumentsRealm.passwd.$USER=$PASS |
Assigns the password for user $USER. If Jenkins security is enabled, you must log in as a user who has an admin role to configure Jenkins. |
--argumentsRealm.roles.$USER=admin |
Assigns user $USER the admin role. The user can configure Jenkins even if security is enabled in Jenkins. See Securing Jenkins for more information. |
--useJmx |
Enable Jetty Java Management Extension (JMX) |
Jenkins passes all command line parameters to the Winstone servlet container. More information about Jenkins Winstone command line parameters is available from the Winstone Command Line Parameter Reference.
Be Careful with Command Line Parameters Jenkins ignores command line parameters it doesn’t understand instead of producing an error. Be careful when using command line parameters and make sure you have the correct spelling. For example, the parameter needed for defining the Jenkins administrative user is
--argument**s**Realmand not--argumentRealm.
Jenkins properties
Some Jenkins behaviors are configured with Java properties. Java properties are set from the command line that started Jenkins. Property assignments use the form -DsomeName=someValue to assign the value someValue to the property named someName. For example, to assign the value true to a property testName, the command line argument would be -DtestName=true.
Refer to the detailed list of Jenkins properties for more information.
Configuring HTTP
HTTPS with an existing certificate
If you’re setting up Jenkins using the built-in Winstone server and want to use an existing certificate for HTTPS:
--httpPort=-1 \
--httpsPort=443 \
--httpsKeyStore=path/to/keystore \
--httpsKeyStorePassword=keystorePassword
The keystore should be in JKS format (as created by the JDK ‘keytool’) and the keystore and target key must have the same password. (Placing the keystore arguments after Jenkins-specific parameters does not seem to work; either they are not forwarded to Winstone or Winstone ignores them coming after unknown parameters. So, make sure they are adjacent to the working --httpsPort argument.)
If your keystore contains multiple certificates (e.g. you are using CA signed certificate) Jenkins might end-up using a incorrect one. In this case you can convert the keystore to PEM and use following command line options:
--httpPort=-1 \
--httpsPort=443 \
--httpsCertificate=path/to/cert \
--httpsPrivateKey=path/to/privatekey
Using HTTP/2
The HTTP/2 protocol allows web servers to reduce latency over encrypted connections by pipelining requests, multiplexing requests, and allowing servers to push in some cases before receiving a client request for the data. The Jetty server used by Jenkins supports HTTP/2 with the addition of the Application-Layer Protocol Negotiation (ALPN) TLS extension. The ALPN TLS extension is connected to the specific Jetty version and has specific requirements depending on the Java version.
Java 11, Java 8u252, and later
Java 11, Java 8 update 252 and Java 8 versions after update 252 can run the ALPN TLS extension by installing the Jetty ALPN java server jar and passing it as a java command line argument. Steps to install the extension are:
- Identify the Jetty version included in your Jenkins server by searching the Jenkins startup log for the string
org.eclipse.jetty.server.Server#doStart. For example:org.eclipse.jetty.server.Server#doStart: jetty-9.4.27.v20200227 - Locate the Java version on the “System Information” page of “Manage Jenkins” to confirm it is Java 11 or 8u252 (or later)
- Download the jetty-alpn-java-server with the version number matching the Jetty version bundled with your Jenkins version
- Place the jetty-alpn-java-server.jar file in a directory accessible to the JVM
- Add
--extraLibFolder=/path/to/extra/lib/folderto the Java command line arguments that start Jenkins
java --extraLibFolder=/opt/java/jetty-alpn-java-server-9.4.27.v20200227.jar \
    -jar target/jenkins.war \
    --http2Port=9090
Java 8u242 and earlier
Java 8 update 242 and earlier can run the ALPN TLS extension by installing the Jetty ALPN boot library corresponding to the exact OpenJDK version you are using into the Java boot classpath. Steps to install the extension are:
- Identify the Java version running your Jenkins server from the “Manage Jenkins” → “System Information” page
- Find the boot library for your OpenJDK version
- Download the matching alpn-boot.jar file to a directory accessible to the JVM
- Add the alpn-boot.jar to the JVM boot classpath by adding
-Xbootclasspath/p:/path/to/alpn-boot.jarto the Java command line arguments that start Jenkins
java -Xbootclasspath/p:/opt/java/alpn-boot-8.1.13.v20181017.jar \
    -jar target/jenkins.war \
    --http2Port=9090
HTTPS certificates with Windows
These instructions use a stock Jenkins installation on Windows Server. The instructions assume a certificate signed by a Certificate Authority such as Digicert. If you are making your own certificate skip steps 3, 4, and 5.
This process utilizes Java’s keytool. Use the Java keytool included with your Java installation.
Step 1: Create a new keystore on your server. This will place a ‘keystore’ file in your current directory.
C:\>keytool -genkeypair -keysize 2048 -keyalg RSA -alias jenkins -keystore keystore
Enter keystore password:
Re-enter new password:
What is your first and last name?
[Unknown]: server.example.com
What is the name of your organizational unit?
[Unknown]: A Unit
What is the name of your organization?
[Unknown]: A Company
What is the name of your City or Locality?
[Unknown]: A City
What is the name of your State or Province?
[Unknown]: A State
What is the two-letter country code for this unit?
[Unknown]: US
Is CN=server.example.com, OU=A Unit, O=A Company, L=A City, ST=A State, C=US correct?
[no]: yes

Enter key password for <jenkins>
(RETURN if same as keystore password):
Step 2: Verify the keystore was created (your fingerprint will vary)
C:\>keytool -list -keystore keystore
Enter keystore password:

Keystore type: JKS
Keystore provider: SUN

Your keystore contains 1 entry

jenkins, May 6, 2015, PrivateKeyEntry,
Certificate fingerprint (SHA1): AA:AA:AA:AA:AA:AA:AA:AA:AA:AA ...
Step 3: Create the certificate request. This will create a ‘certreq.csr’ file in your current directory.
C:\>keytool -certreq -alias jenkins -keyalg RSA ^
-file certreq.csr ^
-ext SAN=dns:server-name,dns:server-name.your.company.com ^
-keystore keystore
Enter keystore password:
Step 4: Use the contents of the certreq.csr file to generate a certificate from your certificate provider. Request a SHA-1 certificate (SHA-2 is untested but will likely work). If using DigiCert, download the resulting certificate as Other format “a .p7b bundle of all the certs in a .p7b file”.
Step 5: Add the resulting .p7b into the keystore you created above.
C:\>keytool -import ^
-alias jenkins ^
-trustcacerts ^
-file response_from_digicert.p7b ^
-keystore keystore
Enter keystore password:
Certificate reply was installed in keystore
Step 6: Copy the ‘keystore’ file to your Jenkins secrets directory. On a stock installation, this will be at
C:\Program Files (x86)\Jenkins\secrets
Step 7: Modify the C:\Program Files (x86)\Jenkins\jenkins.xml file to reflect the new certificate. Note: This example disables http via --httpPort=-1 and places the server on 8443 via --httpsPort=8443.
<arguments>
  -Xrs
  -Xmx256m
  -Dhudson.lifecycle=hudson.lifecycle.WindowsServiceLifecycle
  -jar "%BASE%\jenkins.war"
  --httpPort=-1
  --httpsPort=8443
  --httpsKeyStore="%BASE%\secrets\keystore"
  --httpsKeyStorePassword=your.password.here
</arguments>
Step 8: Restart the jenkins service to initialize the new configuration.
net stop jenkins
net start jenkins
Step 9: After 30-60 seconds, Jenkins will have completed the startup process and you should be able to access the website at https://server.example.com:8443. Verify the certificate looks good via your browser’s tools. If the service terminates immediately, there’s an error somewhere in your configuration. Useful error information can be found in:
C:\Program Files (x86)\Jenkins\jenkins.err.log
C:\Program Files (x86)\Jenkins\jenkins.out.log